Using LVM For Proxmox
Categories:
If you are trying to use Proxmox to set up a homelab for the first time, it must be very confusing to see all the storage related terms, e.g., LVM, LVM-Thin. This post talks about everything you need to know to understand how Proxmox uses LVM as its storage infrastructure.
LVM Basics
LVM (Logical Volume Management) is actually a Linux technology. It is not Proxmox proprietary. Proxmox can leverage LVM as its storage infrastructure, but LVM itself is not part of Proxmox.
Let’s try to understand the basics of LVM, and then we try to understand how Proxmox uses it.
What Is LVM?
The overall goal of LVM is to create a virtual storage layer on top of the physical storage layer, so that the storage usage can be more flexible.
For example, if you have two 1TB disks, but you want to use them together as your root directory. LVM provides a solution to this.
How Does LVM Work?
The following image presents the overall architecture of LVM. (The image comes from wikipedia)
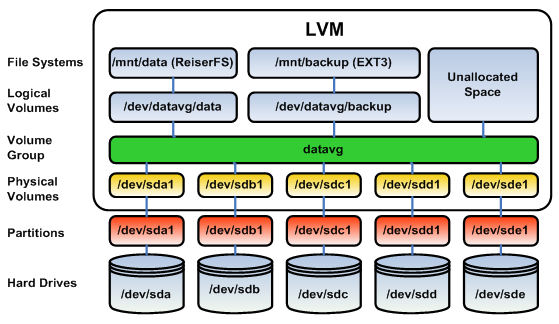
There are a couple of layers involved (from bottom to top):
- On the bottom layer, we have the physical disk itself. These are your hard drives.
- Above the hard drives, we have partitions. Each hard drive is splitted into a few partitions.
- PV (physical volume) is a LVM concept. It is a representation of a physical volume. It is mapped to a single disk partition.
- VG (volume group) is also a LVM concept. A VG contains a couple of PVs.
- LV (logical volume) is a logical volume, which is basically a virtual volume.
- On top of each LV, a file system can be created, and the LV device can be mounted to an accessible directory.
In this design, logical volume does not have to tie to a single physical disk. Logical volume can be created over multiple physical disks.
Installation LVM
On debian and ubuntu, you can do
sudo apt install lvm2
How To Use LVM?
Here are some commands to manage PV, VG and LV.
# Create a PV
pvcreate <disk-device-name>

# Remove a PV
pvremove <disk-device-name>

# List all PVs
pvs

# Create a VG
vgcreate <vg-name> <disk-device-name>

# Remove a VG
vgremove <vg-name>

# List all VGs
vgs

# Create a LV
lvcreate -L <lv-size> -n <lv-name> <vg-name>

# Remove a LV
lvremove <vg-name>/<lv-name>

# List all LVs
lvs
An Example
For example, I have a empty /dev/sdb device,
swe@ubuntu-server:~$ lsblk
NAME   MAJ:MIN RM   SIZE RO TYPE MOUNTPOINT
loop0    7:0    0  63.3M  1 loop /snap/core20/1778
loop1    7:1    0 141.4M  1 loop /snap/docker/2285
loop2    7:2    0  55.6M  1 loop /snap/core18/2667
loop3    7:3    0  55.4M  1 loop /snap/core18/2066
loop5    7:5    0  67.6M  1 loop /snap/lxd/20326
loop6    7:6    0  49.6M  1 loop /snap/snapd/17883
loop7    7:7    0  49.8M  1 loop /snap/snapd/17950
loop8    7:8    0  91.9M  1 loop /snap/lxd/24061
loop9    7:9    0 139.4M  1 loop /snap/docker/2343
sda      8:0    0    32G  0 disk
├─sda1   8:1    0     1M  0 part
└─sda2   8:2    0    32G  0 part /
sdb      8:16   0    32G  0 disk
sr0     11:0    1     4M  0 rom
sr1     11:1    1  1024M  0 rom
swe@ubuntu-server:~$
let’s create a PV on it
swe@ubuntu-server:~$ sudo pvcreate /dev/sdb
  Physical volume "/dev/sdb" successfully created.
swe@ubuntu-server:~$ sudo pvs
  PV         VG Fmt  Attr PSize  PFree
  /dev/sdb      lvm2 ---  32.00g 32.00g
swe@ubuntu-server:~$
and then create a VG on the PV
swe@ubuntu-server:~$ sudo vgcreate test-vg /dev/sdb
  Volume group "test-vg" successfully created
swe@ubuntu-server:~$ sudo vgs
  VG      #PV #LV #SN Attr   VSize   VFree
  test-vg   1   0   0 wz--n- <32.00g <32.00g
swe@ubuntu-server:~$
and then create a LV on the VG
swe@ubuntu-server:~$ sudo lvcreate -L 10G -n test-lv test-vg
  Logical volume "test-lv" created.
swe@ubuntu-server:~$ sudo lvs
  LV      VG      Attr       LSize  Pool Origin Data%  Meta%  Move Log Cpy%Sync Convert
  test-lv test-vg -wi-a----- 10.00g
swe@ubuntu-server:~$
Now we can create a file system on the LG, and mount it for real usage:
swe@ubuntu-server:~$ sudo mkfs.ext4 /dev/test-vg/test-lv
mke2fs 1.45.5 (07-Jan-2020)
Discarding device blocks: done
Creating filesystem with 2621440 4k blocks and 655360 inodes
Filesystem UUID: 5c329fcf-76ec-450a-8d96-dfb816538e3e
Superblock backups stored on blocks:
        32768, 98304, 163840, 229376, 294912, 819200, 884736, 1605632

Allocating group tables: done
Writing inode tables: done
Creating journal (16384 blocks): done
Writing superblocks and filesystem accounting information: done

swe@ubuntu-server:~$ cd /
swe@ubuntu-server:/$ sudo mkdir mount
swe@ubuntu-server:/$ sudo mount /dev/test-vg/test-lv /mount
swe@ubuntu-server:/$ cd mount/
swe@ubuntu-server:/mount$ ls
lost+found
swe@ubuntu-server:/mount$
Now, we have an ext4 filesystem on the LV:
swe@ubuntu-server:/mount$ lsblk -f
NAME                FSTYPE      LABEL  UUID                                   FSAVAIL FSUSE% MOUNTPOINT
loop0               squashfs                                                        0   100% /snap/core20/1778
loop1               squashfs                                                        0   100% /snap/docker/2285
loop2               squashfs                                                        0   100% /snap/core18/2667
loop3               squashfs                                                        0   100% /snap/core18/2066
loop5               squashfs                                                        0   100% /snap/lxd/20326
loop6               squashfs                                                        0   100% /snap/snapd/17883
loop7               squashfs                                                        0   100% /snap/snapd/17950
loop8               squashfs                                                        0   100% /snap/lxd/24061
loop9               squashfs                                                        0   100% /snap/docker/2343
sda
├─sda1
└─sda2              ext4               761b4178-9020-4642-ac79-d172a2a0a06d       21G    28% /
sdb                 LVM2_member        biMIK2-WI2D-ypLl-tVGw-p8hZ-CynW-vo8swy
└─test--vg-test--lv ext4               5c329fcf-76ec-450a-8d96-dfb816538e3e      9.2G     0% /mount
sr0                 iso9660     cidata 2023-01-12-13-13-29-00
sr1
How Does Proxmox Use LVM?
Now you have a basic understanding of LVM. So how does Proxmox use LVM as its storage infrastructure?
In a few words, Proxmox uses LVs for two purposes:
- Use LVs as the client OS disks.
- Use a LV as the host OS root directory.
For example,
root@host3:~$ pvs
  PV             VG  Fmt  Attr PSize  PFree
  /dev/nvme0n1p3 ssd lvm2 a--  <1.82t 738.50g
root@host3:~$
root@host3:~$ vgs
  VG  #PV #LV #SN Attr   VSize  VFree
  ssd   1  13   0 wz--n- <1.82t 738.50g
root@host3:~$
root@host3:~$ lvs
  LV                VG  Attr       LSize   Pool Origin Data%  Meta%  Move Log Cpy%Sync Convert
  root              ssd -wi-ao----  96.00g
  vm-1001-disk-0    ssd -wi-ao----  16.00g
  vm-2000-cloudinit ssd -wi-ao----   4.00m
  vm-2000-disk-0    ssd -wi-ao----  16.00g
  vm-2002-cloudinit ssd -wi-ao----   4.00m
  vm-2002-disk-0    ssd -wi-ao----  16.00g
  vm-5000-disk-0    ssd -wi-ao---- 200.00g
  vm-7000-disk-0    ssd -wi-a-----  16.00g
  vm-7000-disk-1    ssd -wi-a----- 500.00g
  vm-8000-cloudinit ssd -wi-a-----   4.00m
  vm-8000-disk-0    ssd -wi-a-----  32.00g
  vm-8000-disk-1    ssd -wi-a----- 200.00g
  vm-8001-disk-0    ssd -wi-a-----  32.00g
root@host3:~$
The above commands shows that on one of my Proxmox servers, I have a PV, /dev/nvme0n1p3, a VG, ssd, and a few LVs. Each of the client OS has its own LVs.
Using LV as the host OS storage device makes a lot of sense, which is the whole point of LVM.
LVM-Thin
By default, Proxmox does not use LVM. Instead, it uses LVM-thin. The difference between LVM-thin and LVM is that:
- LVM allocates your storage blocks when you create LVs. With LVM, your LV’s storage is guaranteed for your use.
- LVM-thin allocates your storage blocks when you write data to LVs. LVM-thin provides a higher disk utilization, but it can’t guarantee you can use all your LV storage.